Rustic Wedding Décor
Our mothers have all encouraged
us at one time or another, to “make lemonade.”
What I am proposing is most definitely not to add a bunch of extra and
unnecessary sugar to our lives (and a pinch of salt, if you don’t already know
that, its truly the secret to a really spectacular pitcher of lemonade). I’m
proposing we look around, find useful objects and make something
beautiful. We have all received a large
delivery at one time or another, you’ve seen them abandoned in back alleys, I’m
talking about pallets. Pallets are full of
useful wood. They are naturally aged,
attractive and very splintery! Instead of throwing them onto a fire pit, which
would be far less labour intense and may actually lead to some unintended fun,
give them a quick sand and pull out your power tools.
This Summer, I had the
opportunity to help out my wonderful neighbours with some rustic wedding
décor. Where did we start? Pallets.
Every wedding needs signage and lots of it! Parking directions, seating arrangements and
heart warming quotes to set the mood.
Pallets were an extremely affordable option. Affordable, as in, FREE!
I don’t know if you’ve ever
lifted a pallet before but they’re heavy and large. For this handy stuff, I enlisted the help of
my creative, strong and helpful husband and our neighbour, the husband to be.
We knew our signs had to stand up to the elements. You never know what kind of weather a wedding day
will bring! They had to be sturdy enough
to not blow over in the wind, survive a hail storm, deal with sweltering
heat…let’s just say, the local weather is unpredictable in August and this was
an outdoor wedding.
My hubby and I took some time to
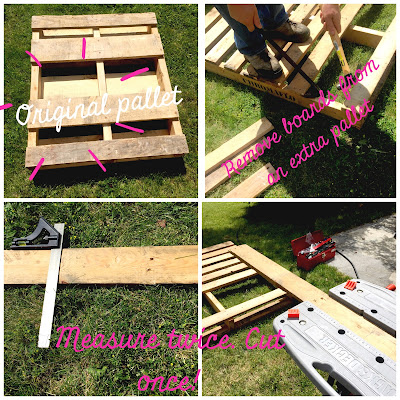
break the pallets down. You’re going to
need a crowbar and a strong back! A full size pallet was simply too large for our signs. We broke down one pallet completely to salvage
wood and cut another down the middle, next to the support beam, to form the
actual sign. Many of your boards will
break, depending on the dimensions of your sign, even a broken board may be
useful. They typically break on the end
joints as opposed to the middle of the board.
Trim the ends, measure and mark with a square and cut to your required
length.
My absolute favourite tip? SAVE ALL OF YOUR NAILS!! These can be reused. A rusty nail is exactly the look you
desire. A rusty nail that you bend over
and smash into your sign, is even better!
Once your boards are cut, it’s
time to rebuild your sign! Try to create a closeness between your boards, this
will make your sign more legible. A
typical pallet has large gaps between wooden boards, so remove a few and add
filler boards from your secondary pallet.
Choose interesting boards for a rustic project, knots and bark are your
friend.
Though it looks lovely, as is,
the wedding colours were yellow and blue.
I couldn’t resist the opportunity to distress!
 |
| Annie Sloan Chalk Paint is my favourite paint to work with!! I used her Old White and English Yellow. I also used Minwax Water Based Wood Stain in Grey. |
I used a dry brush to apply grey
stain and white and yellow chalk paint. I added all three colours, one after
another with no dry time in between. I applied colours with quick brush strokes; making sure to apply heavily to
the corners and edges, avoiding the centre of the boards, which were reserved for writing. I used a few different
brush sizes…and my bare hands.
If you’re hands don’t look like
this when you’re done, you’re probably doing it wrong. Kidding!
I’m a TOTAL MESS – Every creative project, I end up looking like the I
was the project! Glitter, glue, paint,
googly eyes; if I’m using a product, guaranteed I’ll be digging it out from
under nails for a week!
Final step of distressing….a quick sand to
blend your colours, now you’re ready for words!!! When you write your message on
your sign, be sure to use a pencil first.
Pencil can always be erased or sanded off at a later date. Plan your message and your font, in
accordance with the spacing on your pallet sign. It needs to be very easy to read. Choose a tall font when you have wide boards and smaller font with narrower boards. If you don’t like the look of your writing,
or if you do not have a steady hand, use a stencil!!
I used white chalk paint to write my
message. It goes on thick, it’s bright
and easy to read from a distance. When
you’re ready to commit to your penciled in message, start with an angled
brush. The beauty of an angled brush is
that your wording will appear straighter, more angular and neater. Start with thin lines and build them outward
to the thickness you desire. Allow some
time for your first coat to dry, before cutting in with a fine detail
brush. I outlined my lettering with my
detail brush, this makes an overall difference in the quality of your font
and the darkness of your letters.
It is very important to note that
sometimes imperfections will appear as interest.
However, if you’re unhappy with a result, sand the surface and start
over! This is your project, have
fun! If you’re pleased with your work,
that will shine through. Anyone looking
at it will admire your style and talent.
Please comment below if you have
any questions or if you just liked this Big Idea!!


