Search This Blog

Tuesday 19 September 2017

Back to School. Back to Routine.

How do you get ready for back to school? This is a question I asked myself repeatedly, in August. How do you ready yourself? Ready your kids? Welcome routine back into your life? I welcomed school somewhat reluctantly this year. I had an amazing Summer Holiday.  We travelled, we played on the beach, we visited wineries, we stayed up late, we slept in, we basically did everything that we never get to do on a regular basis. I enjoyed time with friends, family and lots of quiet evenings with my husband. It was a dream. 

How do you start back to school after a Summer like that? You throw yourself into it! Routine is good for the soul. A little bit of order never hurt anyone. Book the appointments you've been avoiding, get your kids cool "first day of school outfits" and if you're like me, you start cooking! 


I'm not sure why I feel like preparedness is directly related to how many delicious meals I have prepped in my freezer, but I do. My mom always made wonderfully, delicious food for myself and my siblings while I was growing up. I like to do the same for my kids. 

If you think this blog is going to be about school lunches, you're absolutely right! I hate making lunches!!! I secretly think all moms do.

I tend to batch cook and force my kids to pack their own lunches.  I'm not a fan of sandwich meat but my kids love sandwiches. My solution...cooked chicken breasts. I season with salt, pepper, oregano and roast them in the oven for about 20 minutes at 350 F. 


After they cool, I slice them and pack into small sandwich bags. I store the prepared chicken in the freezer and thaw for sandwiches, as needed. 


As my kids pack their own lunches, I find providing them with lots of healthy options and allowing them the ability to choose makes for fewer fights. It also teaches them about healthy living and good choices. On that note, my kids love treats in their lunches because they are human.  They love to snack on muffins, which I encourage as opposed to over the counter "lunchbox treats." Their favourite muffins are banana, I've added a link to my recipe below. 


A close second favourite would be blueberry muffins. I had hoped to find time to throw together blueberry muffins before school started. Especially, after I found organic blueberries on sale...I didn't find the time, so I washed them, dried them...


and packed them into 1 cup servings, which I placed in the freezer. 


I'll bake muffins at another point. It's totally worth it to purchase fruits and veggies at the height of their season and freeze. These fruits and veggies are going to be as nutritionally rich as possible and typically more affordable, than in the winter. Freezing them allows you to access the wonderful benefits of this fruit, at a later date. 

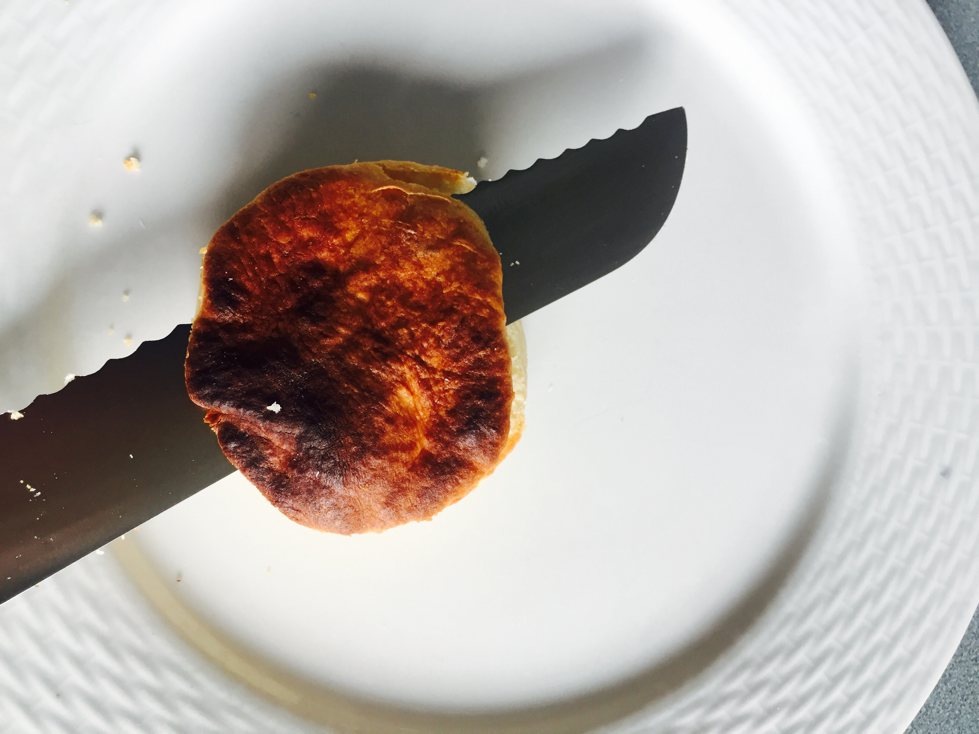
Finally, my kids love tiny casseroles in their lunches and they couldn't be easier to produce!  I always double or triple batch my pasta sauce. Leftover bolognese never goes astray in my household. One of the absolute favourite lunch casseroles in my house is lazy lasagne!!


I let the kids choose their favourite noodle, grate some mozzarella and parmesan and mix with leftover sauce. These casseroles are baked in mammoth muffin tins, and smothered in melty cheese. They are baked at 350F for 15-20 minutes. 


Once they are removed from the oven, you allow them to completely cool and then freeze in the muffin tins. Once frozen they are easily removed from the pan. 


I store them in a ziplock bag, in the freezer until we're ready to pack lunches. 


It couldn't be easier to defrost in the fridge overnight and quickly re-heat in the morning, before school. My kids pack these yummy lunches into a thermos in the morning and gobble them up at lunch! Imagine, all of that was accomplished on a Sunday afternoon. Then school started and it took almost until October to post!!!  Ahhh...back to school! Hope you're all surviving! 

Thanks for reading! If you have any questions or concerns, or you just liked this Big Idea, feel free to comment below! 


Thursday 17 August 2017

Pizza Biscuits. A Happy Accident.


Have you ever completely messed up a recipe? Something that you make all of the time? Something that takes too much to just toss it in it in the garbage bin? That's exactly what I did here. Instead of throwing out my yummy biscuits which I had completely burned...I made pizza biscuits. They turned out great...let's call them a Happy Accident. 

Every time I set out to make my homemade biscuits, this is my mission...


Delicious, warm, buttery biscuits, served with homemade jam.  This is how they turned out...


What the heck!?! In the midst of packing chaos, play dates and busy children, I forgot about my biscuits. They still took time and effort to make. I simply couldn't toss them. I couldn't eat them either...not without slicing the tops off and feeling disappointed with my latest kitchen creation. That's when inspiration struck!


Pizza biscuits! Good bye overly browned biscuit tops. 


I quickly smeared my favourite pizza sauce on to my topless biscuits and then sprinkled with a healthy dose of oregano. 


Mmmmmm...I topped each biscuit with a slice of mozzarella and felt pleased with myself. I was turning a failure into a success. 


I popped those suckers in the oven at 375 F and trusted my nose when they smelled just right. About 8-10 minutes. I served these with a side salad for lunch...the reviews were fantastic. Loved by all, kids adults, even the dog! Best part...I didn't have to throw my hard work in the garbage. 

We're so quick to toss out our mistakes; old items we find around our house, things that seem ugly, useless or just plain burnt.  Don't miss out on that positive moment when you can find goodness in an old item; or take something broken, and make it new again. I love to breathe new life into mistakes, eyesores or accidents. This recipe worked out well...if you want to make your own biscuits, please follow this link:


You can pay attention to your biscuits and enjoy them warm at breakfast with melty butter and jam, or burnt and modified into pizza buns at lunch. Regardless, enjoy them!

Thanks for reading! If you have any questions, comments, or you just liked this Big Idea, feel free to comment below. 

Saturday 29 July 2017

Simple Summer Chicken Pasta


Maybe it's just me but Summertime makes me crave simple ingredients and lots of veggies! Grocery stores and markets are absolutely stocked with delicious, fresh fruits and vegetables at this time of the year. Summer also makes me feel like spending less time in the kitchen, so my recipes must be quick! 
 

This is a quick pasta that I often make and serve with a salad. You can use virtually any vegetables you find in your fridge, carrots are always a nice addition; not featured in this recipe, as I didn't have them in hand.  My staple ingredients for this pasta are mushrooms, zucchini, shallots, garlic, parsley or any other fresh herb, along with parmesan cheese and tomatoes. Sun dried tomatoes are featured in this particular version but honestly, whatever you have in your fridge will do!  If you'd like to whip up your own sun dried tomatoes, follow this link:


I always start "kid friendly pastas" with a mix of shallots and garlic, in butter and olive oil. Shallots have a more subtle taste than onions, my kids are particularly accepting of them. I then I add mushrooms and meat, in this case, chicken thighs. 


Once my flavours blend and my chicken cooks, I begin to add additional ingredients. In a separate pot, I boil noodles in salted water. The starchy, salted water will help to stretch our  sauce, two ladles should be fine, if you're worried about not having enough to dress your pasta, set some aside. If you'd rather skip the starch, chicken broth works extremely well in place of the salted water. Though doesn't stick quite the same way to your noodles! 


Zucchini doesn't need to cook for very long, so quickly mix it into the pot and begin to add the rest of your ingredients.  This should be completed after the shallots, garlic, mushrooms and chicken are completely cooked. If you're adding carrots, be sure to add them at the first addition. Hard veggies and vegetables you'd like to cook down, like onions, add first. Anything that cooks quickly must be added toward the end of your cooking time. This way, your pasta will be filled textured vegetables, which adds interest and palatability to your dish. Lastly, add your cheese, fresh herbs and tomatoes, sun dried or otherwise. 


I always toss my unrinsed noodles directly in with my veggies, sauce and additional olive oil on the stove top. After a crack of fresh pepper, I love to serve this meal "family style" at the table from a large serving bowl or straight from the pot!


Simple, quick, delicious; that's my kind of fast food!!! Thanks for reading! Please feel free to comment below if you have any questions, concerns or if you just liked this Big Idea!!


Thursday 20 July 2017

Oven Sun Dried Tomatoes


I just returned from a holiday in British Columbia. Though it's early in the season, the produce is fresh and ample. Every time I leave BC, I stop at the fruit stands along the roadside and load up on fresh goodies. These grape tomatoes simply had to come home with me. 

Along with the delicious produce came some unwelcome holiday bloat. Salt bloat. I so rarely eat out, I struggle anytime I holiday. Even when I'm surrounded by delightful produce, I puff up like a balloon if I'm eating at restaurants. On my way back to Calgary, I did some research on diminishing salt retention and bloating. It seems that potassium is key. Potassium helps your body to process additional sodium and passes it along with your urine.  (Did I seriously just use the word urine in a blog post? Yup. Yup I did). Needless to say, my next move was to research foods that were high in potassium. Dried fruits, specifically apricots, were at the top of the list, along with bananas, skin on baked potatoes and tomatoes...even more so, sun dried tomatoes. That last one got me thinking. I can make sun dried tomatoes!  


What a cool way to preserve the flavour of my days away. Who am I kidding? The flavour of my holiday was definitely wine!! Regardless, I tried something new and it worked!

Oven Sun Dried Tomatoes 

1/2 lb of grape or cherry tomatoes, tops removed and sliced in half
1 tsp of olive oil 
1 tsp-tbsp of oregano 
1 tsp of olive oil
Sea salt and pepper to taste

Preheat your oven to 200F

Mix your sliced tomatoes with your olive oil and seasoning. 


Spread on a baking sheet and bake for 2.5 to 3 hrs. 


The tomatoes are complete when they are mostly dried out with only a small amount of moisture left. 


Cool and store in the refrigerator in an airtight container. I ate mine in 24 hours, I'm sure they'd love happily in your fridge for 7-10 days. 

I loved my delicious tomatoes, they found their way into salads, pastas and straight out of the refrigerator!!  Sprinkle these things everywhere!!!!  


Thanks for reading!!  If you have any questions, comments or you just liked this Big Idea, feel free to comment below. 


Tuesday 27 June 2017

Long Weekend Project. Installing a Ceiling.


I love a weekend project!!!  I love a long weekend project even more!!!  May Long Weekend, we guarded our schedule. No plans, except to stay home, work hard and make a big change in our home. My hubby and I have travelled to New Orleans twice. On both trips, I was so inspired by "NOLA style."  I have always loved shabby chic decor, New Orleans takes shabby chic to a whole other level. It's broken, it's old, it's water damaged and possesses a level of splendour...fit for royalty. Old School "French Decadence." I love it! 

After our first trip to New Orleans, I painted all of our kitchen cabinets white and ordered crystal knobs on Etsy. $1 each and they were real glass...Nice work right? When I walk into my kitchen in the morning, I admire the prisms on the kitchen floor. Beautiful. These door knobs bring me joy. 

After our most recent trip, to NOLA, I added wallpaper the ceiling to the list. Wallpaper the ceiling? Nuts right? Totally worth the effort. I'm beyond thrilled with the result.

My kitchen ceiling had problems. Big Problems. Popcorn texture with fluorescent lighting. The kind of lighting you'd find in an office. I have avoided working on the ceiling since we bought the house, fourteen years ago. I was terrified of what we would find underneath the two office banks of fluorescent lighting, featured on my ceiling. There would probably be holes, maybe different ceiling textures, different ceiling colours? I had imagined a list of potential problems as long as my arm. A word of advice...don't do this. Just look. Unscrew the light fixture. See what's there. You can always just put it back up. I could have saved myself some work had I done that, though I would not nearly be as thrilled with the result as I am currently. Underneath my ugly fluorescent lights were two standard light fixture boxes. One for each light bank. I could have installed any type of lighting into the lighting box and the popcorn ceiling would have been undisturbed. We did have to move one, but that would have meant a minor repair to the popcorn ceiling, cutting a new hole for a secondary box and pulling some wires. Simple. 


It was out of my fear, that a plot to remove the fluorescent lighting was born. Our kitchen ceiling is not attached to any other part of the house's ceiling. We knew that we could install a "feature" and not have to carry it through the rest of the house. After many discussions, my husband and I decided to put a textured wallpaper onto our ceiling. The texture on the paintable wallpaper that we found, mimicked a tin tile. As you may or may not know, hatching an idea is only the first part of a plan. Actually installing it and deciding upon how to install it is the more difficult aspect of the planning process. 

Our ceiling is sloped, it is almost 12' high on one side of the room and about 8.5 or 9' on the other. That's high, really high! We opted to put drywall directly on top of the popcorn ceiling. I'm 5' tall. This was going to be challenging!

Enter Drywall Lift. Wow! This saved our backs and a lot of time. We rented it for four hours at Home Depot for approximately $40. Best money spent throughout the process of this reno! It was simple to use and saved our old backs! To use the drywall lift, you place your sheet of drywall onto the lift. You then turn a wheel which lifts the sheet of drywall and levels it with the ceiling. Turn the wheel until the sheet perfectly meets up with the ceiling and then screw it into the existing ceiling. So simple. If you've already marked the studs on the ceiling, you line your drywall screws up with your markings. Even more simple. 


In order to save money, we made sure all prep work was completed before picking up our Drywall Lift. 


Ok. That joke never gets old. Stud Finder!!!!  I'm sure my hubby is tired of it! I have always claimed to be a "stud finder," that's how I picked him! Regardless as to where my talents lay, he always insists on using the little yellow thing that beeps and lights up to find studs. He marked them right onto the ceiling with a marker to use as a reference when screwing the new drywall onto the ceiling. He also picked up a nifty little lighting cutter to cut out light fixtures. The lighting cutter looked like a compass and cut perfect holes into the drywall which fit over the lighting boxes. All of this work was complete before the Drywall Lift was picked up. 


I also started priming walls as a new ceiling deserves a new wall colour. Currently, my favourite colour is Vintage White. If that even counts as a colour!  I'm slowly painting the whole house to white and grey. I'll add additional colours with beautiful accents. Like my teal coffee maker, my red Kitchen Aid or funky throw pillows.

Once the drywall boards were installed, we used drywall tape to cover seams, after the tape was dry, we installed the wallpaper. Maybe you know this about me, maybe you don't? Instructions aren't fully my thing. Sometimes there's just a better way. Anytime my husband and I install wallpaper, we use wall adhesive, pictured below, there's no wetting preglued sheets of paper for me!!!!  Way too messy!!! I love this product and use it all of the time, even with preglued paper. You simply paint the surface and the back of the wallpaper and then position accordingly. It dries quickly but you still have some time to push out air bubbles or reposition your paper. Similar to water installation but less drippy, sticky and wet. 


When painting on your glue, you're going to need a long clean space. The hallway was just perfect! We glued our sheets horizontally across the ceiling, right over the lighting boxes. Holes to accommodate lighting were marked and cut, after the fact. 


This was certainly tiring work. The long weekend I budgeted to complete the job was nuts. Glue needs time to dry, especially if you're painting your ceiling grey. We had to allow 24 hours for the glue to cure before painting, which gave us time to stop, enjoy our kids and attend a family dinner. A girl's gotta have some fun!


We chose a grey paint for the ceiling. When painting a ceiling, you need a relatively thick paint, otherwise it drips. Also, when you're working with texture, you require a high pile roller. However, even with a high pile roller, it was challenging to achieve full coverage. Get ready for some hard work, many coats of paint and perhaps even stippling with a paint brush while standing on the top rung of the ladder. 


Work hard, be patient (I totally wasn't), enjoy time with someone you love and this job will make you feel accomplished by the time you're done. I'm so happy with my NOLA Kitchen. 


Please feel free to comment below if you have any concerns, questions or you just enjoyed this Big Idea. Thanks for reading!!


Thursday 15 June 2017

'Tis Taco Tuesday!!!!


'Tis Taco Tuesday!!!  Ok, it's not, but it was!!!  As always, it was a hit in my home!!  My kids LOVE tacos. One problem, I hate premade seasonings. I do not trust large companies to make the right choices for my family. Taco seasoning is intended to sit on the shelf for years. Years!!  In order to do that, companies load their seasonings with preservatives and sodium. Preservatives wreak havoc on the digestive tract and sodium leads to nothing better than heart disease. 

It was under this circumstance that I set out on a journey. A journey to perfect my homemade taco seasoning. I think I've done it!  So do my kids. 


If it was good enough to write in this book and draw a tiny picture of a taco, I think it's worth sharing! 

Mel's Homemade Taco Seasoning

2 tbsp of Chili Powder
1 tsp of Garlic Powder
1 tsp of Onion Powder
1/4 tsp of Crushed Red Pepper or Chili Flakes 
1/2 tsp of Dried Oregano 
1 tbsp of Cumin
1 tsp of Ground Sea Salt
1 tsp of Black Pepper

Mix this list of ingredients together in a resealable container. It makes about 4 heaping tablespoons of seasoning which is plenty for two batches of tacos. One batch today and one for your next Taco Tuesday. 

Instructions:

In a pan, fry your chosen ground meat: beef, chicken, veggie ground, bison, elk, whatever your family prefers. I mix it up and serve different types of tacos every week. Once your meat is browned, add two heaping tablespoons of seasoning and half a cup of water to your pan. Allow ingredients time to marry and  the water to evaporate. Serve with your favourite taco toppings and hard or soft shells. I often choose lettuce as a delicious wrapping option. Pictured below are my chicken tacos with corn tortillas. Mmmmm


When time allows, I love to make my own homemade tortillas. I have placed a link, to my favourite recipe below:


I always make my tortillas with avocado oil. The trick to a really good homemade tortilla is to not over cook them!! You want them soft and rollable! 

My absolute favourite part of Taco Tuesday, other than providing my kids with a healthy meal that they can both gobble up before evening activities, is the Taco Salad I eat for lunch on Wednesday. A Taco Salad, topped with my favourite salad topping...Fritos. Yup. Fritos. 


Thanks for taking the time to read this post. I hope it inspires you to try a new recipe; to take control away from big companies and mix up your own seasonings. Open your spice drawer and think creatively. You won't regret it!  Making your own taco seasoning takes almost the same amount of time to mix up as it does to tear into a premade envelope and it's much healthier for you and your family. 

Feel free to comment below if you have any questions, concerns or you just liked this Big Idea!

Thursday 25 May 2017

Calendar Making Woes and Joys


I have a "Love / Hate" relationship with my calendars. I have been making them since my daughter turned 1. She's 12 now. That's a lot of calendars and a ton of scrapbooking!  The first year I made them, I decided the month before Christmas that I was going to make 5 handmade calendars for the grandparents, great grandparents and one for myself. I had no idea of the time and stress this gift might cause. Even those simple calendars required me working day and night. My husband became an over night scrapbooking sensation, popping eyelets through pages and stamping the month names onto the calendars...even SPETEMBER (his mom got that calendar). My initial intention with calendars was to make one, a highlight of MacLean's first year. They were so well received that I keep making new ones...every year. 


These calendars highlight special moments that occurred in the previous year, during that month. We had a fantastic 2016! A new puppy, growing children, my nephews starting preschool and kindergarten. I was so excited about how the calendars turned out this year! Each layout, more special than the last. This year's calendars were equally as pressed for time as the first simple one I sat down to do in 2005, the technique, however, has improved. 


I use many different scrapbooking techniques in my calendars. Each page begins with a photo, from there, I draw out colours, find coordinating papers and look for inspiration. I often find inspiration at a local scrapbooking store, The Scrapyard, its a vortex of creativity. They offer many classes and have the most wonderful scrapbookers on site. There is always someone around, willing to offer you some helpful advice or to teach you the latest technique. 


When I make calendar layouts, I always leave the brand strip on the bottom of the page. I bind the calendars myself and find that this extra bit of paper helps with reinforcing your coil. I later choose a coordinating paper that I can fold over the front and back of the layout to ensure a strong reinforcement. This is challenging. Not reinforcing. Mixing your patterns. The blank calendar page gets glued onto the back of your layout. Its not always easy to match the black and orange layout to whatever colour scheme you chose for your November layout. Neutral patterns come in handy for that!


As you can see from this photo. I opted for a black and white wood grain print, which works well with my November layout and even better with the October prints!

This year, I used so many new photo editing apps. These added even more detail and interest to my layouts. I've always loved the instagram filters but there are so many other special apps out there. A few of my favourites are "A Beautiful Mess," which is an amazing collage app and "Waterlogue," with this app you have the ability to change your photos into watercolour "paintings." A Beautiful Mess allows you to put photos into collage frames, add filters, wording, images and borders. Waterlogue, has so many different styles of watercolour that you can create photos that look like historic artworks or even comic book frames. When these two apps are used in conjunction with each other, you can create interesting pieces like this...


When you're rushing to create a Halloween page, having the ability to print a photo layout like this one, on an 8.5 X 11 photo page, makes it very quick to create a 12 X 12 scrapbooking layout. As you can imagine, most of the layout is covered, you only have a few details to add to your hybrid digital / handmade scrapbooking piece. 

Typically, the last layout in my calendar is a family photo in front of our tree. I was renovating for guests prior to Christmas and designing a calendar. Decorating my tree would have to come after I mailed the calendars out to two sets of grandparents. I found inspiration for my December layout in an old photo of my brother and I at Christmas and an old Christmas book, T'was the Night Before Christmas. This copy of the classic Christmas story belonged to my children's great grandmother. I couldn't help but photocopy the image of Santa in the chimney onto cardstock and fussy cut it, to add as an important vintage element on my holiday layout. I just love the way it turned out. 


These gifts are so personal, my mother in law's calendar features very different photos than the one for my mom. My mother's calendar is drenched with photos of her grandchildren (my neice and nephews that live so close to me). My own often features family photos of my little family unit of four. All of the layouts, however, are made from the same papers and elements and come together quickly. The first one taking 2-3 hours to create and the final one, 15 to 20 minutes to recreate. 


I hope after reading this article, you find some inspiration to sit down with your photos and make something beautiful for someone you love. This project always causes stress because I never start it early enough. I'll never stop making them though, I enjoy them way too much. 

Thanks for reading!!  Feel free to comment below with any questions or concerns, or if you just liked this Big Idea. 

Wednesday 24 May 2017

Quick and Healthy Eats. A Local Treat. Soffritto Bison Lasagna


I realize I often write about convenience food.  Its because quick meals are a reality for many families. These modern times have different rules and expectations than many other generations. In so many homes, both parents work, children are busy with extracurricular activities; we're hyper focused on nutrition and require a healthy meal to be laid out on the table before rushing off to evening activities. There are ample reasons for busyness. The reality of the situation is that we fill our time, regardless of what it is filled with, it is filled. 

Lately my time has been filled with renovations. Painting, gluing, wallpapering and all in my kitchen. A fridge in my dining room; a week end without a stove; the perfect recipe for lots of eating out.  Or preparing quick meals like this...


Romantic pic hey? Even a filter cannot make this turkey wrap look appealing. We were installing a new ceiling, we needed some quick energy. The Laughing Cow Cheese was a supremely good alternative to Mayo, my kids loved it. Unfortunately, I had limited space to cook and eat and lots to do. Going out for a burger was exactly what we needed to do! 

We opted for a local restaurant, Boardwalk Burgers. We had a coupon, their new location was close to our house and we had never tried it before. Why not try something new? The burgers were pretty good, I've had better but they were decent, the fries were yummy and the malts looked good...though I didn't try them. Seemed like a few too many calories for one meal. Our coupon was for a free burger. We ordered two large fries, two regular drinks, and four burgers. The total was around $40, with a free burger. The large fries were obscene, one would have been sufficient for the whole family. Regardless, the kids liked it, but I had to listen while they whined about no malts. I left, frustrated with my kids, ready to get back to work in the kitchen and with a stomach ache. That kind of food doesn't sit well. Its not great fuel and though the thought of a diner style restaurant is fun, it is never what your body needs. 

This evening I was looking for some actual food. I'm still working hard with the reno...ceiling paint is on the list for things to do tonight. I didn't want to spend a ton of time on food prep or messing up my kitchen but I wanted real food. I stopped by one of my favourite local stores...Soffritto. I checked in with Gord, the owner, to see what he would recommend. Lasagna was his suggestion. Bison Lasanga. I decided to spend the same amount on dinner as our burger excursion on the week end. $40. That bought me two lasagnas. I had a Caesar Salad Kit in the fridge, on which I had spent a whopping $3.99; so this meal was essentially the same cost. Not the same nutrients. 


Soffritto boasts that their meals are made from high quality and local ingredients. They have every right to boast. Farmers Market bison, locally sourced tomatoes, fresh chewy and stringy cheese, homemade noodles and a housemade, herbaceous, rich sauce that features one of my favourite flavours...red wine. 

It cooked up easily and quickly and according to the package instructions. I preheated the oven to 375 F; I opted to cover loosely with tinfoil at 30 minutes and baked for a total of 50 minutes. 


They baked up beautifully. Smelled divine and tasted delicious! Real food. No kitchen mess. What a delightful and quick meal. I served lasagna with my favourite side salad, Caesar with some chopped kale, for added goodness. The kids were thrilled with dinner and so was I. After a week of garbage eating, I was happy to present a home cooked meal that didn't leave me feeling exhausted, in a messy kitchen. The ceiling wasn't going to wait. 


Best part of this experiment...it came in waaaay under budget...


It was so filling, we only ate one. $20 to feed my whole family? That's great value!  Cheaper than take out. Luckily the lasagnas come in these nifty containers, we packaged up the second one to be consumed for lunches or another meal later this week. Tonight, to celebrate our delicious, under budget meal, we opened a lovely Tempranillo. It perfectly complimented dinner and to motivated this girl to get some construction done! 


I understand that we don't all have a Soffritto around the corner, but look around, you might be surprised by what you find at your local Farmers Markets, Grocery Stores and Restaurants. It's ok to demand more from the food you're eating. Your body needs fuel. Delicious fuel. Thanks for reading!!!  If you have any questions or concerns or you just liked this Big Idea, please feel free to comment below!