Search This Blog

Showing posts with label kids. Show all posts

Tuesday, 19 September 2017

Back to School. Back to Routine.

How do you get ready for back to school? This is a question I asked myself repeatedly, in August. How do you ready yourself? Ready your kids? Welcome routine back into your life? I welcomed school somewhat reluctantly this year. I had an amazing Summer Holiday.  We travelled, we played on the beach, we visited wineries, we stayed up late, we slept in, we basically did everything that we never get to do on a regular basis. I enjoyed time with friends, family and lots of quiet evenings with my husband. It was a dream. 

How do you start back to school after a Summer like that? You throw yourself into it! Routine is good for the soul. A little bit of order never hurt anyone. Book the appointments you've been avoiding, get your kids cool "first day of school outfits" and if you're like me, you start cooking! 


I'm not sure why I feel like preparedness is directly related to how many delicious meals I have prepped in my freezer, but I do. My mom always made wonderfully, delicious food for myself and my siblings while I was growing up. I like to do the same for my kids. 

If you think this blog is going to be about school lunches, you're absolutely right! I hate making lunches!!! I secretly think all moms do.

I tend to batch cook and force my kids to pack their own lunches.  I'm not a fan of sandwich meat but my kids love sandwiches. My solution...cooked chicken breasts. I season with salt, pepper, oregano and roast them in the oven for about 20 minutes at 350 F. 


After they cool, I slice them and pack into small sandwich bags. I store the prepared chicken in the freezer and thaw for sandwiches, as needed. 


As my kids pack their own lunches, I find providing them with lots of healthy options and allowing them the ability to choose makes for fewer fights. It also teaches them about healthy living and good choices. On that note, my kids love treats in their lunches because they are human.  They love to snack on muffins, which I encourage as opposed to over the counter "lunchbox treats." Their favourite muffins are banana, I've added a link to my recipe below. 


A close second favourite would be blueberry muffins. I had hoped to find time to throw together blueberry muffins before school started. Especially, after I found organic blueberries on sale...I didn't find the time, so I washed them, dried them...


and packed them into 1 cup servings, which I placed in the freezer. 


I'll bake muffins at another point. It's totally worth it to purchase fruits and veggies at the height of their season and freeze. These fruits and veggies are going to be as nutritionally rich as possible and typically more affordable, than in the winter. Freezing them allows you to access the wonderful benefits of this fruit, at a later date. 

Finally, my kids love tiny casseroles in their lunches and they couldn't be easier to produce!  I always double or triple batch my pasta sauce. Leftover bolognese never goes astray in my household. One of the absolute favourite lunch casseroles in my house is lazy lasagne!!


I let the kids choose their favourite noodle, grate some mozzarella and parmesan and mix with leftover sauce. These casseroles are baked in mammoth muffin tins, and smothered in melty cheese. They are baked at 350F for 15-20 minutes. 


Once they are removed from the oven, you allow them to completely cool and then freeze in the muffin tins. Once frozen they are easily removed from the pan. 


I store them in a ziplock bag, in the freezer until we're ready to pack lunches. 
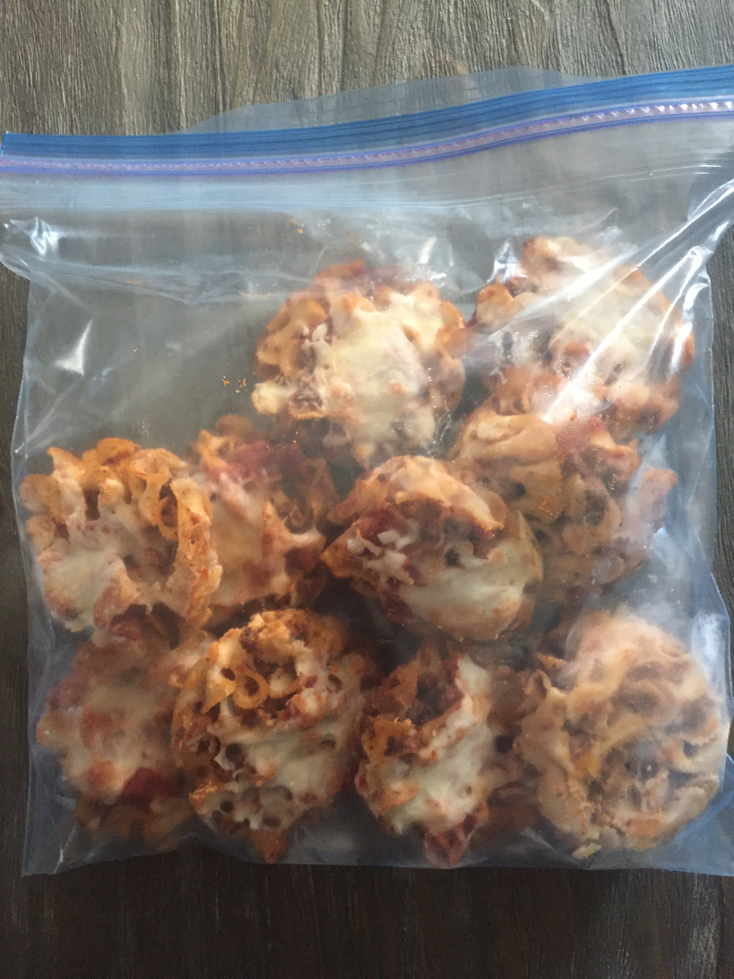


It couldn't be easier to defrost in the fridge overnight and quickly re-heat in the morning, before school. My kids pack these yummy lunches into a thermos in the morning and gobble them up at lunch! Imagine, all of that was accomplished on a Sunday afternoon. Then school started and it took almost until October to post!!!  Ahhh...back to school! Hope you're all surviving! 

Thanks for reading! If you have any questions or concerns, or you just liked this Big Idea, feel free to comment below! 


Wednesday, 5 April 2017

Wednesday Wings


I love chicken wings. My whole family loves chicken wings. We eat them at least once per week. The trick to enjoying chicken wings and actually having them consumed by your children is...simple ingredients. I love a spicy wing smothered in Frank's Red Hot or honey garlic sauce as much as the next gal. My kids, do not. Let's face it, sauce can be added after the fact! Throw the Red Hot, the BBQ sauce, the honey mustard on the table. Whatever your pleasure. Encourage your kids to try different condiments; be aware, however, that they often add unnecessary sugars, sodiums and calories to your wings, an already fatty cut of meat. This is a Wednesday night meal...not a Pub Fest! Simple ingredients are good for your body, easy to digest and healthy for you and your family. 

In this recipe, I'm featuring my favourite olive oil. We have a local oil store, Soffrittos, filled with wonderful ingredients delicious food and oodles of excellent service. I just love stopping in for a visit and can't live without their garlic olive oil!

Wednesday Wings
 
Ingredients:
Garlic Olive Oil
(this one is a free pour...as much as you like! My recommendation is be generous). 
3 cloves of garlic
Salt and pepper
A handful of thyme 
One club pack of chicken wings


Preheat your oven to 400 F 

Separate your wings removing the tips (set those aside for a quick chicken broth http://melsbigideas.blogspot.ca/2017/02/?m=0
from the drumette and the wingette. 

Add your separated wings to a cookie sheet. Crush three cloves of garlic, free pour your garlic olive oil over your wings, add sea salt and pepper and hand mix to gently coat. Place the seasoned chicken wings into the oven for 15minutes. Flip and bake for an additional 15-20 minutes. If you require more of a crisp on the skin of your wings, broil for and flip for 2-3 minutes. When you remove from the oven sprinkle with thyme and serve.  


Monday, 13 March 2017

Cooking with Kids. Low Dairy Cream of Mushroom Soup

 
I love to have company in the kitchen. Today, I'm watching my nephew, for the afternoon. I have a busy week planned with my kids, so I felt that this was the perfect opportunity to get some food prep done for the week ahead.  What a helper my little nephew is!!  Only 3 years old and a total busy body!  Today we prepped Cream of Mushroom Soup for my lunches and baked potatoes for another family recipe. 


My nephew had no interest in consuming my soup but he was happy to help out. Let's face it, the kitchen is fun! Experimenting with cooking teaches kids so many valuable lessons. Cooking is a life skill; kids learn about different ingredients, health benefits, become more adventurous with food and they create quality memories with their parents, their grandparents, or in this case, their Aunt Mel. 


Years ago, I purchased this egg slicer from Pampered Chef. I don't think I have ever used it for eggs. Mushrooms, strawberries but never eggs. It's perfect for kid cooking. It slices soft fruits or veggies with a series of metal wires. My nephew loved quickly slicing mushrooms with his impressive physical strength. I roughly chopped the sliced mushrooms and prepped the shallot and garlic while he gabbed and prepped.  

I'm lactose intolerant. Butter has never been an issue for me, but milk and cream are absolutely unwelcome in my digestive tract. As a result, I have developed this "compromise of a recipe" so I can continue to enjoy one of my favourites....Cream of Mushroom Soup. 


Low Dairy Cream of Mushroom Soup

1 pack of Cremini Mushrooms, roughly chopped
2 cloves of garlic, crushed
1 Shallot, finely chopped
1/4 cup of butter
1/4 cup of flour 
2 cups of mushroom broth
1 cup of coconut milk 
1 tbsp of herbs de provence 
Salt and pepper to taste

Melt a 1/4 cup of butter over medium heat. Once melted; add mushrooms, shallot and garlic to the pan.  Add seasoning to the mushrooms. Sauté until the mushrooms are nicely browned. Once browned, add 1/4 cup of flour to the mix. A paste, or a roux will form. Add coconut milk a 1/2 cup at a time.  Evenly mixing the roux in with the liquid, after each addition. After the coconut milk has been added; do the same with the mushroom broth; 1/2 cup at a time. 


Does this look like a kid that isn't enjoying himself? He even tried the soup. Which he didn't like...then later told me it was kind of good. Regardless, we had a fun afternoon. My nephew and I made some memories and some soup. 


Now to clean the kitchen!  Kid help is fun, but even the floors needed to be washed down after the soup! Totally worth the chaos. We had a great afternoon. 


If you have any questions, concerns or you just liked this Big Idea, feel free to comment below.  Thanks for reading! 

Tuesday, 7 March 2017

Mini Chicken Pot Pies


I have good kids. Really good kids. During their las holiday from school, I assigned them the task of prepping a meal that could be frozen and thawed for their lunch boxes. I was in the midst of making a homemade chicken broth and had cooked chicken and mini tart shells on hand so chicken pot pies it was!!  


Find my chicken broth recipe here:


At first my son was upset about the idea of chicken pot pie. He absolutely despises peas and doesn't enjoy carrots with gravy. My daughter, on the other hand was thrilled. We opted to make a simple thick gravy, I then gave them free reign with flavours. They were in charge. This was their cooking experience. 

We started with a roux, which is simply a mixture of melted butter and flour.  In a frying pan we melted down 1/3 of a cup of butter (I added a finely chopped shallot to the butter) and then added 1/4 of a cup of flour. When these ingredients were well blended, we added 2 cups of chicken broth to the mix, 1/2 tsp of sea salt and 1/2 tsp of poultry seasoning. We whisked the ingredients together over medium heat. My son liked the gravy at this point, so we transferred half of the gravy into another pot. My daughter opted to add 1/2 tsp of Herbs de Provence and a sprinkle of fresh cracked pepper. 

My son added 2-3 chunked chicken thighs to his gravy. My daughter added the same amount of chicken plus 1/4 cup of frozen peas and 1/4 cup of cooked carrots. 

We had thawed our tart shells on the counter, while we cooked the chicken pot pie filling.  For each chicken pot pie, we required 2 shells. My daughter made 8 pies and my son, 7. We filled the bottom shell with 2-3 tablespoons of pie filling and then laid a thawed pie shell over the filled bottom shell. The kids then pinched and fork printed the edges of the pie shells. 

We preheated our oven to 425 F. While the oven was heating, I cut slits into the tops of the pies. As a pie needs a way for steam to escape, while it bakes. My kids had made two different flavoured pot pies; this seemed like the perfect opportunity to label their lunchtime snacks. My son's pies were labeled with a "D" and my daughter's, with an "M". We then baked the pies in our preheated oven for 30 minutes. 


After the pies cooked and the kids gobbled a few up for lunch, they were packed for the freezer. 


When packing lunches, the kids thaw a pie or two over night in the fridge. We warm them in the morning and place them into a thermos, if they opt to not complete this morning task, they happily eat them at room temperature at lunchtime. 

This kitchen project has worked out extremely well for my family!!  My kids are pleased that they created something wonderful in the kitchen and I'm satisfied that they are filling their bellies with a healthy and satiating lunch. 


Thanks for reading! If you have any questions or concerns, or you just liked this Big Idea, feel free to comment below. 

Sunday, 29 January 2017

Lunch Box Mac N' Cheese


I'm making lunch snacks for the kiddos today! These are quick, easy and generally, a crowd pleaser. They freeze amazingly well and your kids can eat them at any temperature. 

LUNCHBOX MAC N' CHEESE


You can add any amount of cheese to these mini casseroles.  The more cubed cheese, the cheesier!  I always use a strong cheese for a bolder flavour but honestly, use whatever you prefer. You'll be baking inside mammoth muffin tins, which I find, make a perfect size tiny casserole. They fit wonderfully inside a lunchbox. 

Preheat the oven to 325 F. 


Grease the mammoth muffin tins and begin adding uncooked noodles and cubes of cheese to the tins, in layers.  To increase the ease of clean up, you could always try making these inside muffin cups. 


Fill the tins, leaving about a centimetre of head space. 


Top each tin off with milk. Fill until most of the noodles are covered. 


Add salt and pepper to the tops of the casseroles. Bake in the oven for 30 minutes at 325 F. If you're like me and enjoy the top of your casserole browned; turn the oven on broil for 1 minute.  I always salt one last time after I remove from the oven. 


Allow the casseroles a few minutes to cool in the pan.  Use a knife to loosen the Mac N' Cheese and remove with a small spatula. 


Freeze, once the casseroles are cooled. Thaw the night before, in the fridge to place in a lunchbox. My kids are happy to eat these at room temperature. However, if they prefer them heated, place boiling water in a thermos with a lid; allow to sit for 10 minutes. Empty the thermos and dry. Heat one casserole in the microwave for 50 seconds and place in the warmed thermos. 

Feel free to comment below if you have any questions or concerns, or you just liked this big idea!!  Thanks for reading!

Thursday, 19 January 2017

Lunchbox Snacks: Faux Bocconcini Salads


Quick thought for today!!!  I was buying some groceries for my kid's lunches. They totally love these bocconcini hors d'oeuvres and what a simple protein based snack to energize and fill them up!!  Ideal for a lunch box!

They found the bocconcini to be a tiny bit "plain." That's my daughter's word for..."it needs salt."  Next time I'll have to add some Serrano Ham.  For today, I gave in and salt and peppered. They didn't love them with basil but were pleased with spinach. 

Pat on the back...this mom is pleased to send a new option in the lunchbox!!

Thanks for reading!!  Comment below if you have any questions, or you just liked this big idea!!


Monday, 16 January 2017

Quiche / Omelette: Doing Two Things at Once

I'm a Mom of two.  Multitasking or doing two things at once is a necessary Mom Skill. This afternoon's food prep included making my lunch as well as prepping some mini quiches for the kid's lunch kits. An omelette for me and tiny, little egg pies for them!

Just recently, I discovered that my children love quiche. It needs to be a simple quiche, but they LOVE IT! I have been whipping up this recipe for my little darling's lunch boxes. 

The kids pack their own lunches, daily. I find providing them with a number of homemade, healthy options, leads to better choices. I love this recipe because it tastes good at any temperature and it freezes well!


To save a bit of time, I bought frozen unsweetened tart shells....thank you to the "No Name" employee / machine  that rolled out my pie crust and put it into convenient little baking containers. 


Mini Quiches and an Omelette for a Hungry Mom

5 eggs
10 unsweetened tart shells 
1 cup of milk 
1 cup of strong cheese
2 tbsps of flour
Sea salt
Pepper

Preheat your oven to 375 F

Remove 10 tart shells from package to thaw.  

Whisk together 5 eggs and 1 cup of milk. 

Add flour and mix well. 

Shred 1 cup of strong cheese, my kids love cheddar or gouda. Mixing cheeses is never a mistake! Today I used an Old Cheddar and some Parmesan Cheese. 

Add the shredded cheese to your egg mixture along with salt and pepper. 

Fill 10 tarts. 

Bake in the oven for 20 minutes. 

Melt butter in a frying pan and add the left over egg mixture to your pan, heated to medium. Cook appt 6 minutes and fold. Allow another 1-2 minutes per side. 

Voila! Omelette! 


By the time your omelette is consumed, the mini quiches will be ready. Allow them to cool on the counter before you refrigerate or freeze. 

Feel free to comment below if you have any questions or you just liked this big idea! Thanks for reading!

Saturday, 7 January 2017

What to do with Winter Bananas

I don't know what has happened with the bananas in my home town as of late, but they're coming off of the trucks spotty. My kids like green bananas. Yuck! Imagine, flavourless, hard, green bananas. They LOVE them.  Needless to say, it's been hard to provide my turkeys with their favourite snack. Upside...spotty...overripe bananas are on sale everywhere!

I love baking. So, I have been making muffins. Tons of them! Banana Muffins freeze so well and they're such a great hit in lunches. My bestie and I have been modifying our Banana Muffin recipe for years.  This is the option I make most often. I feel that the following recipe balances health, goodness and the level of kid happiness!


Oatmeal Banana Muffins

7-8 Ripe Bananas
1 1/2 cups of sugar 
2 eggs
1/4 cup of butter, melted
1/4 cup of coconut oil, melted
3 cups of flour 
1 tsp of baking soda 
1 tsp of baking powder 
1/2 tsp of salt
2 tsp of vanilla 
1/2 cup of oatmeal
1/2 cup of chocolate chips (optional)


Preheat oven to 350° F

Mix dry ingredients in a bowl (soda, baking powder, salt and flour).  I use unbleached flour but feel free to substitute whole wheat or try out a gluten free option...be careful make sure you use something that can be substituted cup for cup. Some flours require extra modification with wet ingredients. 

Mash bananas with sugar.  Feel free to substitute your favourite sweetener or reduce the sugar...it'll work out. 

Stir in eggs. 

Melt butter and coconut oil together in the microwave, stir into the mixture. 

Add vanilla.  

Blend in dry ingredients. 

Add oatmeal and if your kids have been behaving really well, chocolate chips. 

Fill muffin cups or greased muffin tins to 3/4. Makes 24 muffins or two loaves. 

For 24 muffins bake 20-22 minutes. Two loaves will take 45-50 minutes. 

Remove from the oven, cool for two minutes before removing from pans. Enjoy!

Cook times may vary depending upon altitude and appliances. 

If you liked this big idea feel free to comment at the bottom!